Wow - I'm overwhelmed with the kind of feedback I've received on my previous blog post!
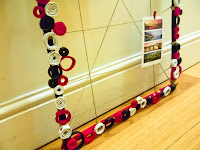
In that post I promised to let you know what I finally did with my set of black, red and white round bits. Well, this, ladies and gentlemen, is what I made:
The inspiration behind this project was, well, from all over the place!
But if you go to my Pinterest page, you'll see projects I've pinned like this, this and this that really inspired me. My biggest problem with these was that I couldn't really find decent frames. So I thought long and hard about what I could substitute for the frame and came up with the idea of using old magazines.
I'd like to add that this frame is completely made of recycled (magazine) paper. Quite proudly so, I won't lie! =)
But at the end of the day, I ended up mixing and matching a number of things I've come across and just jumbled them all together to create this. A bit o' this and a bit o' that and bam - a masterpiece! =)
I must admit, this post deserves a tutorial in itself.
You already know how to make the round bits from this post. What I'm now going to do is give you a quick run down of what you'll need to do to re-create this one.
What you'll need (supplies)


In that post I promised to let you know what I finally did with my set of black, red and white round bits. Well, this, ladies and gentlemen, is what I made:
 |
| I absolutely love the way it finally turned out! =) |
The inspiration behind this project was, well, from all over the place!
But if you go to my Pinterest page, you'll see projects I've pinned like this, this and this that really inspired me. My biggest problem with these was that I couldn't really find decent frames. So I thought long and hard about what I could substitute for the frame and came up with the idea of using old magazines.
I'd like to add that this frame is completely made of recycled (magazine) paper. Quite proudly so, I won't lie! =)
But at the end of the day, I ended up mixing and matching a number of things I've come across and just jumbled them all together to create this. A bit o' this and a bit o' that and bam - a masterpiece! =)
I must admit, this post deserves a tutorial in itself.
You already know how to make the round bits from this post. What I'm now going to do is give you a quick run down of what you'll need to do to re-create this one.
What you'll need (supplies)


- stack of old magazines (that's right, some more!)
- old newspapers
- glue stick / white school glue / home made glue / any other form of glue you prefer
- knitting needle / long pencil / long stick or rod
- poster paints and paint brushes
- old rope (if you have any spare old rope around) or thick thread or yarn
Procedure / steps
Follow steps 1-6 from this tutorial - pay special attention to step 6. =)
Once you have your stacks of rolled up magazine paper ready, get ready to get the ball rolling! =)
7. Take two of these cylindrical paper rolls and put one inside the other. There's no better way to explain this than to actually show you. So, do this:
 |
| Place one paper cylinder on top of the other and then, well, put one inside the other. |
 |
| Voila! They stay! |
Don't stick them all the way inside each other, but make sure they're firmly placed so they don't fall out. Don't worry about gluing them. The next few steps will take care of that bit for you. =)
8. You'll have rolls like these. The tiny ones are there just for comparison.

For the frame that I made, I used three cylindrical paper rolls one-on-top-of-the-other for the length. And two of 'em stacked up for the breadth.
9. Then I glued three of these cylindrical stacks together in a row and waited for them to set. And I created another such stack. At the end, I had two stacks of three cylindrical stacks together. That is 2 x giant cylindrical stacks composed of 3 individual paper cylinders.
I placed these 2 identical stacks on top of each other and glued them together. And then I let this duo set.
If none of that made sense, take a look at this picture - it might help you figure out my gibberish! =D
 |
| I hope that makes it clear! |
10. Once I had all my four sides created and set, I got out my painting gear and let the Picasso in me out.
Basically, I coloured the length of the frame black and the breadth red. And then I let these dry off.

11. The next step was tricky. This is where I struggled the most!
I had a tough time trying to figure out how I was ever going to glue these four sides together. Doesn't matter what glue you use, it's rolled up paper and will just tear apart the minute there's any sort of pressure applied to it.
And there would be pressure on this little baby, given what I had in mind.
So after a lot of thinking and pondering, it finally hit me - tie the damn ends together with some good old string! Sturdy string, but string!


12. Once the sides are secure, you're going to need a mesh of sorts to clip your pictures or other stuff onto. I realised that I wouldn't be able to stick a mesh like this or this onto a paper frame. So I thought it's best to go ahead and recreate a mesh with my newfound secret weapon: string!
With the ends attached and mesh created, this is what my frame looked like:

13. Bland. That's what the string looked like to me.
*shrugs* Sorry, but I put in a lot of effort and I just didn't like it looking plain smack in the centre of all the gorgeousness! So what'd I do? I got some golden dust (acrylic) paint thingamajig and went straight to work. I painted the strings tying the ends of the frame together as well the strings creating the mesh.
 |
| Brush on some tap water onto the string before you paint over it. The string won't 'drink up' any of the actual paint when you start painting. Also, it'll make the painting go smoother. |
 |
| There you go - works like a charm! Nice glittering gold paint! And it goes really well with black, red and white! |
14. Once this is all done, it's time to add the little round bits from this tutorial onto your frame! Figure out what placement looks best and glue 'em on nice and strong. Pretty straightforward, really. =)
The result? This:


You can touch up the little round bits, if you want. I like mine like this - giving a hint of what's underneath.
Aaaaaaaaaaaaaaaaaaaaaaaaand that, ladies and gentlemen, is my first completed crafts project in the UK. =)
Needless to say, if you recreate this, do drop in a link or a picture to share with me. I'd love to see what you guys got up to. =)
And of course, if you have any comments on this blog, drop in a comment below.
=)


